Azure AD B2C Custom Policy with REST API
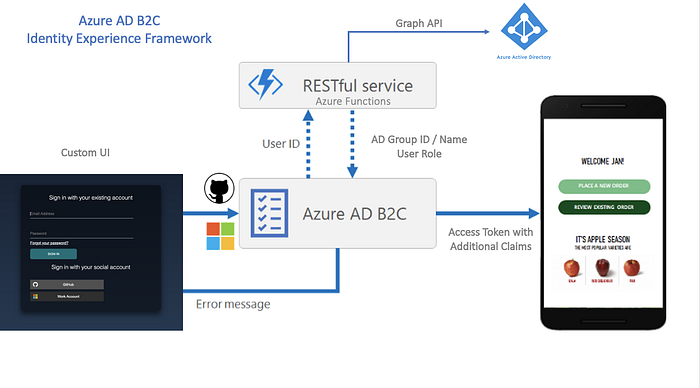
In this article I’ll describe how to create an Azure AD B2C custom policy using the Identity Experience Framework. The goal is to implement :
- A custom UI / Login page
- Integrate with third party APIs to retrieve additional claims
- Customise Azure AD group and user schemas to support additional metadata
- Implement an Azure Function using the Graph API to retrieve the metadata
- Implement a user journey using the Identity Experience Framework
- Setup the tools for logging and troubleshooting the User Journey with App Insights
- Authenticate with an Azure AD work account or a Github Account
Repository
The code for the project is available on GitHub :
What’s Azure AD B2C and how does it compare to Azure AD?
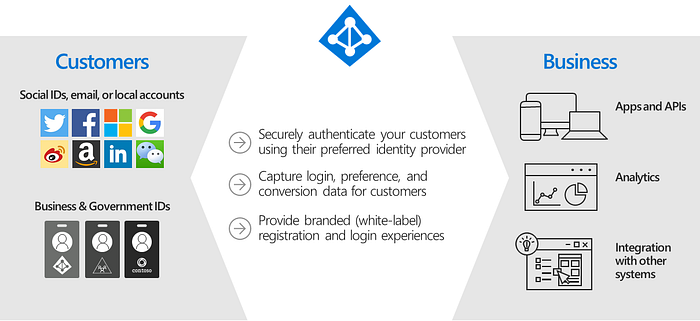
Azure Active Directory B2C (Azure AD B2C) is an identity management service that enables custom control of how your customers sign up, sign in, and manage their profiles when using your iOS, Android, .NET, single-page (SPA), and other applications.
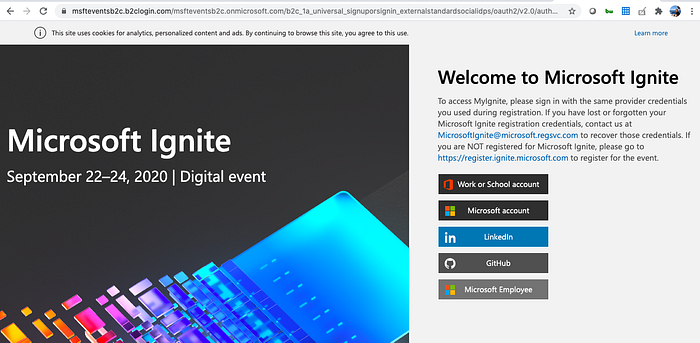
If you’ve registered to Microsoft conferences in the past such as Ignite or MS Build, the authentication system behind the scenes is Azure AD B2C and gives you the option to login with Social Medias, your Work or School account, or even a Microsoft account that you might already use for your personal email or Xbox Live.
Identity Experience Framework vs User Flow
Azure AD B2C provides an easy to configure / out-of-the-box user flow experience that should cover 80% of the cases. For advanced configuration the Identity Experience Framework is the way to go, it provides advanced configuration capabilities to customise the authentication flow and integrate with third party systems but the learning curve can be steep if you are starting from scratch.
Custom Policy core concepts
Before we dive in let’s have a look at a few concepts for building custom policies.
Azure AD B2C custom policies enables a custom authentication flow using three foundation layers:
- A user directory that is accessible by using Microsoft Graph and which holds user data for both local accounts and federated accounts (essentially an Azure AD)
- Access to the Identity Experience Framework that orchestrates trust between users and entities and passes claims between them to complete an identity or access management task.
- A security token service (STS) that issues ID tokens, refresh tokens, and access tokens (and equivalent SAML assertions) and validates them to protect resources.
Policies leveraging the Identity Experience Framework are declared with XML files, a very good starting point is the custom policy starter pack on Github :
XML files are built using an extension mechanism starting with:
- TrustFrameworkBase.xml providing core features (it’s not recommended to change this file)
- TrustFrameworkExtensions.xml : this is where most of the customisation should happen
- SignUpOrSignin.xml which defines the relying party component that provides the
The XML files use an inheritance model, the Identity Experience Framework in Azure AD B2C adds all of the elements from base file, from the extensions file, and then from the RP policy file to assemble the current policy in effect
Policy Keys
Azure Active Directory B2C (Azure AD B2C) stores secrets and certificates in the form of policy keys to establish trust with the services it integrates with. These trusts consist of:
- External identity providers
- Connecting with REST API services
- Token signing and encryption
Getting started — Create an Azure AD B2C Tenant + App
To get started with our implementation we need to created an Azure AD B2C tenant.
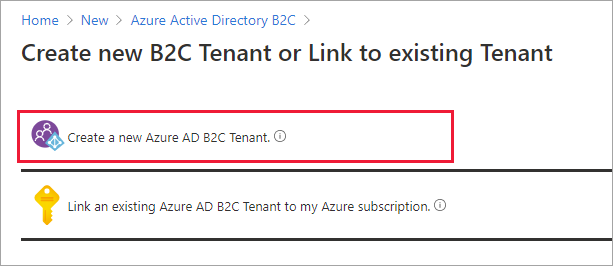
- Create a Azure AD B2C Tenant: To get started you will first need to create an Azure AD B2C Tenant as documented in https://docs.microsoft.com/en-us/azure/active-directory-b2c/tutorial-create-tenant. Make sure to link the Azure AD B2C Tenant to your Azure subscription
- Create an App: Before your applications can interact with Azure Active Directory B2C (Azure AD B2C), they must be registered in a tenant that you manage. Create an App in your Azure AD B2C Tenant as per https://docs.microsoft.com/en-us/azure/active-directory-b2c/tutorial-register-applications
- Create a storage account: We need a storage account to store the custom ui code of our login page. you may also use an existing web application. Next, create a container and set the public access level to blob in order to have the webpage and assets available without a SAS token
- Upload a custom UI (described in this article)
The folder custom UI in the github repostory contains basic HTML and CSS to have a branded Azure AD B2C login page. The page must contain the following div:
A sample UI is implemented in the UI folder:
- login.html: contains a very basic login form
- signin.html: contains a branded user experience
- assets: contains required CSS, images, that are embedded in the webpage

Take note of the URL for the signin.html. Assuming you created a container called b2c you should have a url like: https://<storage_account_name>.blob.core.windows.net/b2c/signin.html
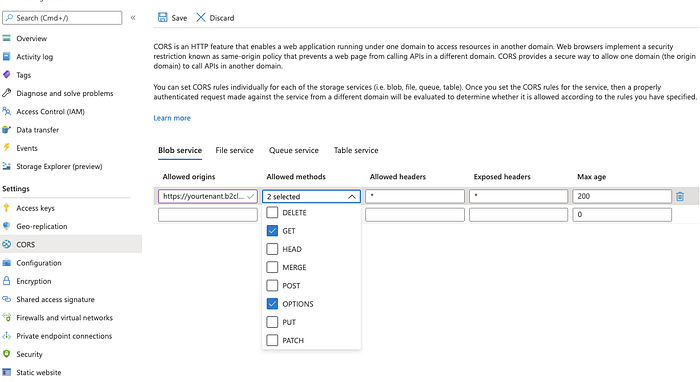
Note that HTTPS is mandatory, also Enable CORS for your Storage Account I’ve configured both HEAD and GET with my Azure AD B2C tenant origin: https://yourtenant.b2clogin.com
Expose additional attributes with Azure Function and Graph API
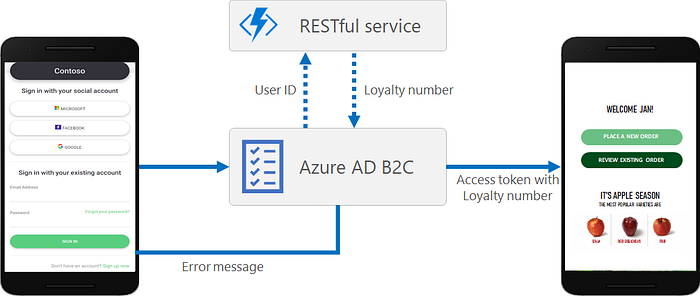
In this section we want to add additional claims in our authentication by retrieving additional information in Azure AD. We are going to leverage the Graph API and we will use an Azure Function as REST API integrated in our authentication flow.
The function will retrieve two information:
- Group Membership ID for the User in Azure AD
- Group Membership Name
The Graph REST Function project in the Git repository contains code to query the Microsoft Graph API using Application-level authorization: There is no signed-in user (for example, a SIEM scenario). The permissions granted to the application determine authorization.
The Azure AD tenant admin must explicitly grant consent to your application. This is required both for application-level authorization and user delegated authorization.
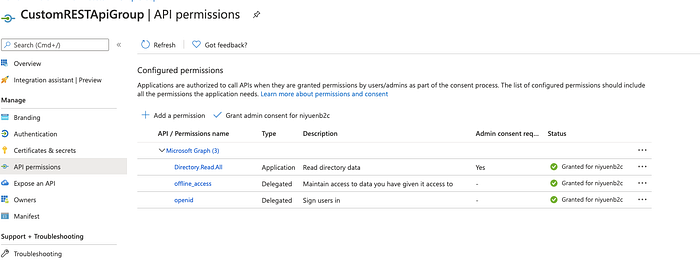
Create an App Registration in the Azure AD B2C Tenant and grant the following permission
Create a new App Registration — I’ve called mine CustomRESTApiGroup — and assign App-level permission on the Graph API:
- Microsoft Graph
- Directory.Read.All : The application must be able to read users and group, the Function will not make changes therefore we do not require Write permission
- offline_access
- openid
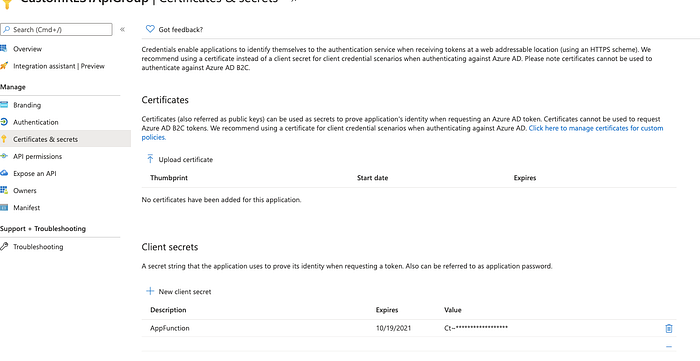
Next step we need to create a secret, we will be using both the AppID and App Secret in our Azure Function
Configuring the Function App
The Function app accepts an objectId (the user in the b2c tenant) and retrieves additional information using the Microsoft Graph API by querying the underlying Azure AD Tenant to retrieve group membership information. We will be assigning groups and adding additional group properties at the Azure AD level (not the Azure AD B2C) which acts as the underlying control and data plane
The Function app requires the following information:
- AppId
- ClientSecret
- TenantId (The Azure AD B2C Tenant)
You can configure the local.settings.json file for local debugging, I’ve also set the Azure Function App Environment settings.
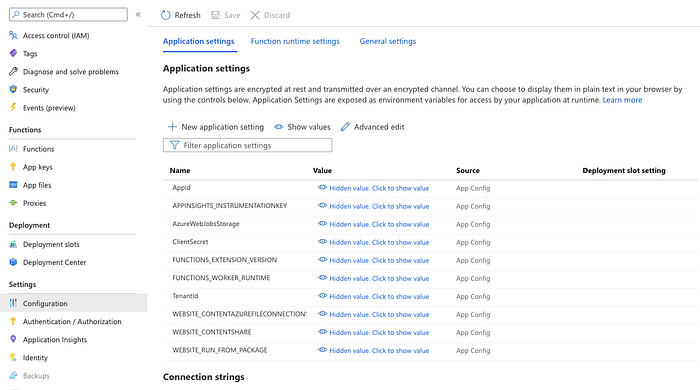
The Azure function has a single Method: GetUserGroup which accepts a single parameter objectId which will be the objectId of our user in the AD B2c Tenant.
The function first retrieve the app settings (either local or env variables)
Retrieving data with the Graph API
Next step is to create a client to query the Graph API. we are using a IConfidentialClientApplication interface from MASL (Microsoft Authentication Library) as documented: https://docs.microsoft.com/en-us/azure/active-directory/develop/msal-net-initializing-client-applications
We can now create a client:
GraphServiceClient graphClient = new GraphServiceClient(authProvider);
We are using the user ObjectID to retrieve group membership using the Graph client:
Finally we iterate on each group and filter them out to only retrieve security groups.
Note that this is a PoC and exception handling is minimal and must be improved for production use
The code above retrieves a custom property name tenantType, make sure you replace the code with the App ID of the generated B2C App, The value is unique to each B2C tenant. Group extensions enable you to extend the default schema of Azure Active Directory: https://docs.microsoft.com/en-us/previous-versions/azure/ad/graph/howto/azure-ad-graph-api-directory-schema-extensions
You will need to replace the placeholder with the App Id of the auto-generated b2c-extension-app in your AD B2C Tenant which can be found in the Azure AD B2C App registrations section:
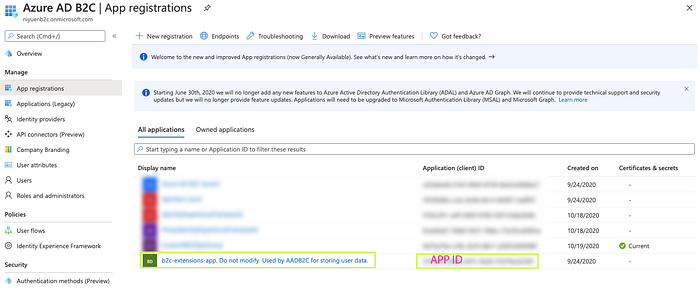
You can read more about the extension-app concept here : https://docs.microsoft.com/en-us/azure/active-directory-b2c/extensions-app
Deploy the function to Azure Function
You can use VS code to directly connect to your Azure subscription and deploy the Azure function:https://docs.microsoft.com/en-us/azure/azure-functions/functions-develop-vs-code?tabs=csharp
You can also deploy the Azure Function locally using the azure-function-core-tools:
The code won’t work just yet as we are trying to retrieve new properties from our Azure AD Objects (Group Object in this case). Before we can do that we need to extend our Azure AD schema
Azure AD schema extension
Two schema extensions are required:
- At the group level to add the TenantType
- At the user level to store the user role
We use the Graph API to extend the schema of our AD B2C Tenant application. We will need a Global Admin role to perform this operation. Either use the global admin credential or create a temporary local user (e.g global@yourtenant.onmicrosoft.com) if you are having issue with your work account.
We will need a bearer token to call the Graph API. For simplicity we will use the Graph Explorer web app (make sure you are not using a private/incognito session as it didn’t work for me): https://graphexplorer.azurewebsites.net/
step 1 — Login
In this example I’ve created a local global admin (@mytenant.onmicrosoft.com)
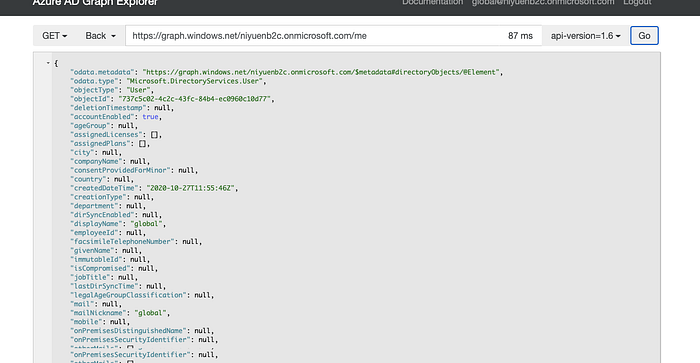
You should be able to query your user information:
GET https://graph.windows.net/yourtenant.onmicrosoft.com/me
step 2 — Application details
Use the ObjectId and not the AppId of the b2c_extension_app to query the available extension for the AD B2C — it should be empty for both the users and the groups
In the Graph Explorer:
step 3 — Adding custom group property
We need to add a new schema extension to support the tenantType custom property at the group level
Validate that the extension is properly registered:
Note that the extension has been renamed from tenantType to extension_YOUR_B2C_EXTENSION_APP_ID_tenantType
step 4 — Create a group
We now need to test our new schema:
- Create a group in the underlying Azure AD, not the Azure AD B2C as group are not supported, the Azure AD supporting your Azure AD B2C tenant is used as the backbone behind the scenes
- Take note of the Group’s ObjectId
step 5 — Assign a value for our new extension property
Once again we use the Graph API though the Graph Explorer, this time to patch the group we just created (note that you can also create the group directly using the Graph API)
Write an extension value:
Validate that the group contains the right data — “extension_YOUR_B2C_EXTENSION_OBJECT_ID_tenantType”: “Lender"
Adding a schema for the User
We also need to add an additional attribute for the User, this is much easier and built-in the Azure AD B2C UI:
- Select your Azure AD B2C Tenant
- Select User Attributes
- Add a custom attribute — let’s name it role

Validate that the user attribute is correctly configured in the Tenant schema extension using the same Graph API query:
The new schema extensions that we configured as role in the user attribute is reflected as extension_YOUR_B2C_EXTENSION_OBJECT_ID_role in the AD schema extension
Let’s now write that attribute for a user using once again a PATCH method
Quick Recap
Alright, we are halfway through our configuration / pre-requisites to implement our custom policy. At this point we now have:
- The desired schema: Groups with a new tenantType property + Users with a new role property
- A sample user with the role property set
- A sample group with the tenantType property set
- An Azure Function that can read the Azure AD information using App Auth with the Graph API
- A Storage account + container with html + assets (css, images) to provide a custom login experience
Custom Policy — prep work
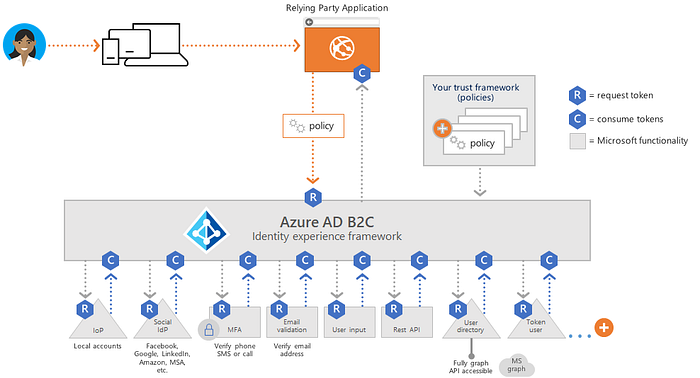
It is now time to put it all together and configure our Azure AD B2C policy using the Identity Experience Framework
Custom policies are configuration files that define the behaviour of your Azure Active Directory B2C (Azure AD B2C) tenant. Custom policies can be fully edited by an identity developer to complete many different tasks.
Prerequisites
You can follow the getting started guide to create the supporting app and secrets : https://docs.microsoft.com/en-us/azure/active-directory-b2c/custom-policy-get-started
1 — Add signing and encryption keys
- Sign in to the Azure portal.
- Select the Directory + Subscription icon in the portal toolbar, and then select the directory that contains your Azure AD B2C tenant.
- In the Azure portal, search for and select Azure AD B2C.
- On the overview page, under Policies, select Identity Experience Framework.
2 — Create the signing key
- select Policy Keys and then select Add
- For Options, choose Generate.
- In Name, enter TokenSigningKeyContainer. The prefix B2C_1A_ might be added automatically.
- For Key type, select RSA.
- For Key usage, select Signature.
- Select Create.
3 — Create the encryption key
- Select Policy Keys and then select Add.
- For Options, choose Generate.
- In Name, enter TokenEncryptionKeyContainer. The prefix B2C_1A_ might be added automatically.
- For Key type, select RSA.
- For Key usage, select Encryption.
- Select Create.
Register Identity Experience Framework applications
Azure AD B2C requires you to register two applications that it uses to sign up and sign in users with local accounts: IdentityExperienceFramework, a web API, and ProxyIdentityExperienceFramework, a native app with delegated permission to the IdentityExperienceFramework app. Your users can sign up with an email address or username and a password to access your tenant-registered applications, which creates a “local account.” Local accounts exist only in your Azure AD B2C tenant.
You need to register these two applications in your Azure AD B2C tenant only once.
Note: Make sure to exactly use IdentityExperienceFramework and ProxyIdentityExperienceFramework for the application names, otherwise the custom policy will not work!
Register the IdentityExperienceFramework application
- Select App registrations, and then select New registration.
- For Name, enter ProxyIdentityExperienceFramework.
- Under Supported account types, select Accounts in this organizational directory only.
- Under Redirect URI, use the drop-down to select Public client/native (mobile & desktop).
- For Redirect URI, enter myapp://auth.
- Under Permissions, select the Grant admin consent to openid and offline_access permissions check box.
- Select Register.
- Record the Application (client) ID for use in a later step.
Next, specify that the application should be treated as a public client:
- In the left menu, under Manage, select Authentication.
- Under Advanced settings, enable Treat application as a public client (select Yes). Ensure that “allowPublicClient”: true is set in the application manifest.
- Select Save.
Now, grant permissions to the API scope you exposed earlier in the IdentityExperienceFramework registration:
- In the left menu, under Manage, select API permissions.
- Under Configured permissions, select Add a permission.
- Select the My APIs tab, then select the IdentityExperienceFramework application.
- Under Permission, select the user_impersonation scope that you defined earlier.
- Select Add permissions. As directed, wait a few minutes before proceeding to the next step.
- Select Grant admin consent for (your tenant name).
- Select your currently signed-in administrator account, or sign in with an account in your Azure AD B2C tenant that’s been assigned at least the Cloud application administrator role.
- Select Accept.
- Select Refresh, and then verify that “Granted for …” appears under Status for the scopes — offline_access, openid and user_impersonation. It might take a few minutes for the permissions to propagate.
Configuring the Custom Policy
We’re finally here — we’ve setup Apps, secrets, signatures let’s now implement our Policy using the Identity Experience Framework:
The Custom policy is split in the following files:
- TrustFrameworkBase.xml : this is the base file, modifications should be avoided if possible
- TrustFrameworkExtensions.xml: prefer extending the base framework in this file
- SignUpSign.xml: contains the Relying Party configuration — essentially the main entry point for the user experience.
Configuring the policy files
In each file:
- Modify the TenantId property
- Modify the PublicPolicyUri
In TrustFrameworkExtensions.xml:
- find the element
<TechnicalProfile Id="login-NonInteractive">. - Update the IDs as below:
→ Replace ProxyIdentityExperienceFramework_APP_ID with the AppId from the ProxyIdentityExperienceFramework app
→ Replace IdentityExperienceFramework_APP_ID with the AppId from the IdentityExperienceFramework app

Adding new claims to the schema
Two additional Claims have been added to the schema in TrustFrameworkExtensions.xml. The claim will reference the new Group Attribute and the new User Attribute, respectively tenantType and role.
We need yo update the claim schema to reflect these changes
This enables the custom policy to return both groups information and the user role information as a claim in the JWT token
Adding identity providers
Two identity providers have been added:
- Common Azure AD to support multi-tenant work accounts
- GitHub to test and additional OpenID provider
About Claim Providers: A claims provider contains a set of technical profiles. Every claims provider must have one or more technical profiles that determine the endpoints and the protocols needed to communicate with the claims provider.
These providers are configured in the Claim provider section. Claim providers are APIs and third party providers returning Claims as part of the authentication process. We are leveraging the following ClaimProviders:
- Azure AD — to retrieve the user information stored in the Azure AD backend, we’ve customized the provider in TrustFrameworkExtensions.xml to support the additional extension_role Claim and Configure the metadata section with both the b2c-extension appId and ObjectId
- GitHub
- Local accounts for users directly registered in AD B2C
- REST API — This will call our Azure Function.
→ Configure the REST URL endpoint — this should link to the url of your Azure function.
→ The REST Api has a single Outputclaim : <OutputClaim ClaimTypeReferenceId="groups" /> which matches the return value of our Azure Function
→ Make sure to secure your Azure Function using a Function key — otherwise your Graph API won’t be protected and user information in the directory will be fully exposed
- Common-AAD for Work Accounts through a multi tenant application configured in an Azure AD (not necessarily the Azure AD B2C tenant) — you can also restrict authentication to a specific tenant
→ Configure the client_id then create a new secret in the policy keys, I’ve called mine B2C_1A_AADMSDNFabrikam
→ Store the client secret for the multi tenant app that you’ve created for App registration — this is the app that will be used to host your site or application.
→ The secret is used in the CryptographicKeys section of the Provider definition
Registering the Custom UI
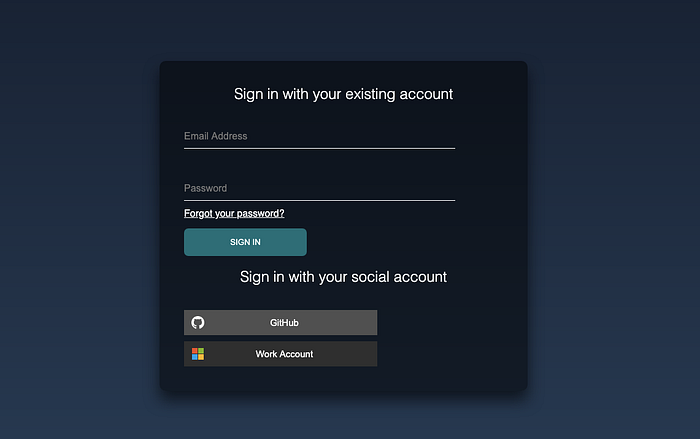
The custom UI is simply registered using a <ContentDefinition> block in the TrustFrameworkExtension.xml. The ContentDefinition section can contain multiple entries to address your different authentication scenarios (Login, Reset Password, Updated profile …).
Notice that we directly reference our HTML file hosted in a blob storage, you can also reference any public URL (WebApp, CDN)
Removing the SignUp link
By default the local account experience shows a signup link, this is controlled in the Local Account Claim Provider in TrustFrameworkExtensions.xml using the setting.showSignupLink key.
Available keys are documented here: https://docs.microsoft.com/en-us/azure/active-directory-b2c/self-asserted-technical-profile
Returning the extension_role claim
To return the User customer attribute configured as role in the AD B2C UI and reflected as extension_role in the Graph API we need to add an output claim for the Azure Active Directory Claim provider inherited from TrustFrameworkBase.xml:
- Add metadata to register the ClientId and AppObjectId
- configure the output claims for both
AAD-UserReadUsingEmailAddressandAAD-UserReadUsingObjectIdtechnical profiles
Note that we directly reference extension_role and not extension_YOUR_B2C_EXTENSION_APP_ID_role as the Azure AD B2C engines configure this automatically
Calling the REST API / Azure Function
The REST API defined in a Claim Provider is called by adding a new step in the UserJourney section of TrustFrameworkExtension.xml
We add an orchestration step right before sending the jwt (moving the sendClaims from step 7 to 8):
The new orchestration step is of type ClaimsExchange and references the GetUserGroups TechnicalProfile defined in our REST API ClaimProvider defined in TrustFrameworkExtensions.xml
Final piece — the Relying party configuration
The last configuration file is the relying party which summaries the login experience by leveraging the user journey.
The RelyingParty element specifies the user journey to enforce for the current request to Azure Active Directory B2C (Azure AD B2C). It also specifies the list of claims that the relying party (RP) application needs as part of the issued token.
An RP application, such as a web, mobile, or desktop application, calls the RP policy file. The RP policy file executes a specific task, such as signing in, resetting a password, or editing a profile. Multiple applications can use the same RP policy and a single application can use multiple policies. All RP applications receive the same token with claims, and the user goes through the same user journey.
The relying party references the user journey and also allows to remap the output claims if required:
<DefaultUserJourney ReferenceId=”SignUpOrSignInFabrikam” />The SignUpOrSigninFabrikam.xml file remaps two claims:
- from signInNames.emailAddress to email this is required to have the email information when using the local sign in mechanism as the email is not set as an OutputClaim by default
- from extension_role to role to provide a cleaner output claim
Upload the Custom Policy
Upload the custom policy files in that specific order:
- TrustFrameworkBase.xml
- TrustFrameworkExtensions.xml
- SignUpOrSigninFabrikam.xml
- ProfileEdit.xml
- PasswordReset.xml
Testing
To test our custom claim we are using the https://jwt.ms — a site managed by Microsoft to decode your token and retrieve the claims.
The SignUpOrSignInFabrikam custom policy can be tested from the Azure Portal -> Azure AD B2C -> Identity Experience Framework -> Custom Policies -> B2C_1A_SignUpSignInFabrikam

Troubleshooting with AppInsight
Azure AD B2C custom policies require configuration files and relies on multiple subsystems, a dedicated logging mechanism is provided by Application Insights.
To configure log tracing in development you need to:
- Create an AppInsights workspace
- Retrieve the instrument key
- Configure the relying party to stream the logs
First configure AppInsights as the User Journey Recorder Endpoint in the relying party definition
Then add a UserJourneyBehaviors section within the RelyingParty section and configure the Instrument Key
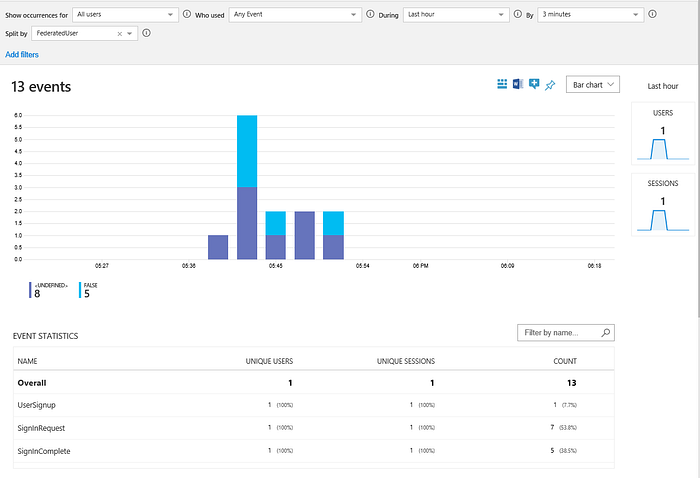
You can now access the traces from the Custom Policy using the traces table in AppInsights. Note that it can take a few minutes for the log to become accessible in AppInsights.
I’m using the following KQL query to filter out relevant results (should you use an existing AppInsights workspace)
traces | where timestamp > ago(24h) | where message contains "UserJourney"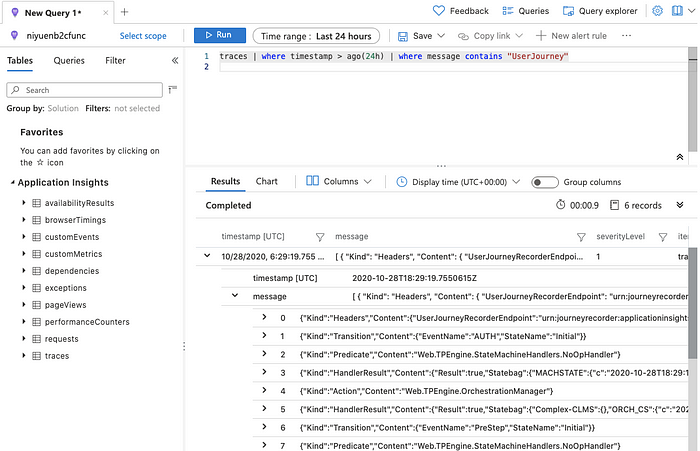
Final Result
That’s it, I’ve been through a lot of steps in this article as the Identity Framework is very powerful but has a steep learning curve. We’ve covered:
- Creating an Azure AD B2C Tenant and linking it to an Azure Subscription
- Creating a multi-tenant Azure AD App (can be either your existing Tenant or the Azure AD B2C tenant)
- Creating a custom UI stored in a Blob storage with CORS enabled
- Creating the supporting App : ProxyIdentityExperienceFramework and IdentityExperienceFramework for Azure AD B2c
- Deploying an Azure Function querying the Graph API to retrieve additional Group information
- Customising the Azure AD B2c Schema to add additional Group and user attributes
- Leveraging the Identity Experience Framework XML files to create a custom login experience and user journey
- Configuring App Insights to bring troubleshooting capabilities during development
We now have a fully managed authentication flow that can support any app, the UI is also customised to support your own branding.
References:
Adding a custom extension:
- https://stackoverflow.com/questions/44947258/is-it-possible-to-add-custom-attributes-to-a-group-in-azure-ad-b2c
- https://docs.microsoft.com/en-us/previous-versions/azure/ad/graph/howto/azure-ad-graph-api-directory-schema-extensions
- https://blog.siliconvalve.com/2018/02/16/azure-ad-b2c-custom-attributes-how-to-easily-find-their-unique-key-value/
Define custom user attributes in custom policies:
Add the custom claim type
Debugging:
